There's a long-term research project for which I've been gathering equipment over a few years so far. One of the things I expect to need is an instrument capable of capturing light intensity signals in the multi-GigaHertz range. Achieving this with equipment old enough to be cheap, isn't so easy. I have a couple of Hewlett Packard HP 54121T sampling scopes, and these have the bandwidth, but only for electrical inputs, not optical. I'd been hoping to find a cheap high bandwidth optical to electrical converter, but so far haven't had a lot of luck with that.
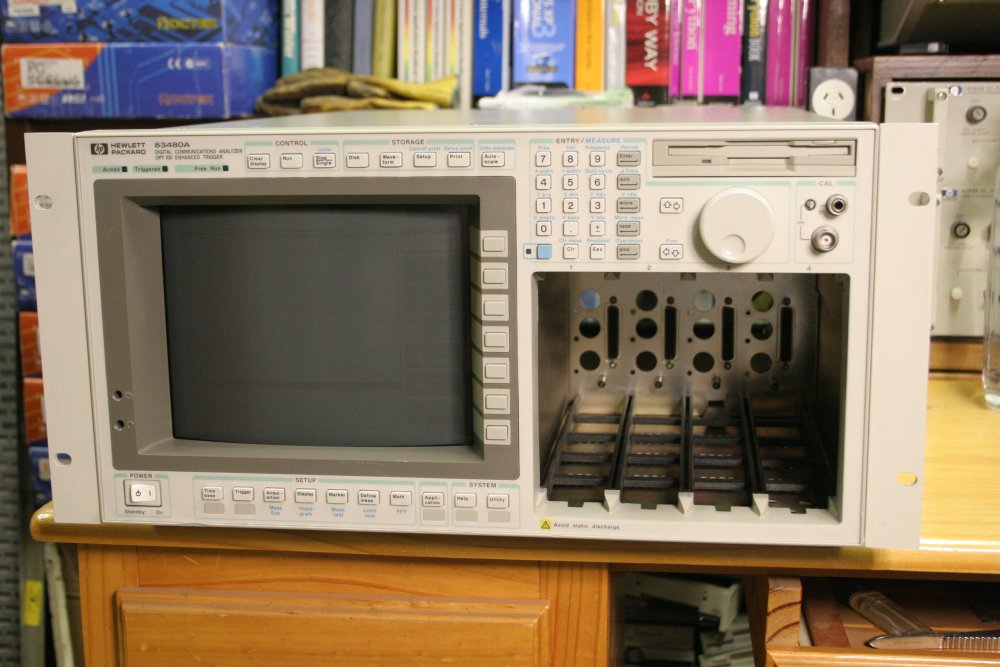
 Another instrument that would do the job is the HP 83480A Digital Communications Analyzer. It's actually an oscilloscope, and has identical hardware to the HP 54750A, but has some extra software for analyzing communications signals including fiber optics. These things are 'mainframes', that accept a range of plugin modules for different measurement tasks. The attraction (for me) is that many of the plugins include optical fiber sampling channels. Some go as high as 30GHz.
The downside is, these instruments were the absolute top end of Hewlett Packard sampling scopes gear in the late 1990s to early 2000s. Since that's not so long ago they are still generally high priced on ebay. The mainframes are typically listed from a few hundred to a few thousand dollars, while for some reason the plugins are still much higher — well above a thousand and usually two or three thousand dollars. Listings for any of these modules for less than $1000 are rare.
So I'd considered it sadly unlikely that I'd be able to afford this kind of system, at least not for a while. To rub it in, earlier this year I happened to come across a brand new set of manuals for the 83480A, for free. Sigh.
Something curious about that project I mentioned, is that over the years I've been pursing it there have been a number of remarkable strokes of good luck. It's a rather ambitious goal, which I won't be detailing here. Among several reasons for not describing it, is that if I did everyone would laugh. And it's true; at first glance the entire idea does seem completely absurd and unachievable. And yet... time after time 'things' happen which result in major boosts to progress.
Also minor boosts. Such as this story of the 83480A, though chance has so far played only a small part.
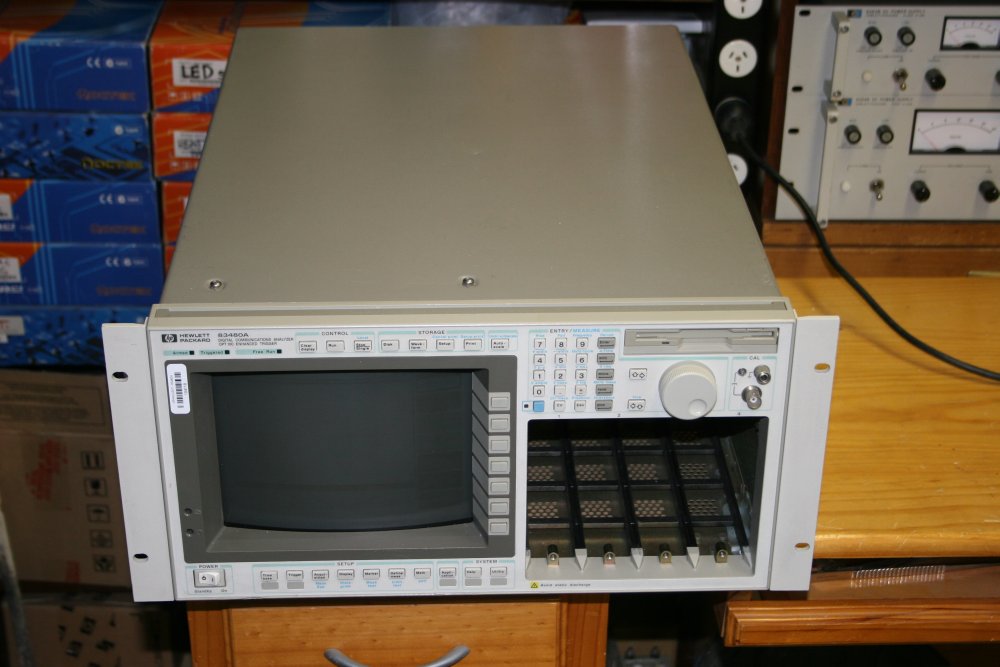
A month ago, I came across an ebay listing of an 83480A mainframe for just US$112.50. The listing had a few warning flags, such as the seller didn't show the instrument's power-up self test screen, and the back of the unit is missing the feet — which suggests the case had been opened, then closed up again by someone in an 'I give up' frame of mind. On the plus side, I've bought from that seller before and in that case he'd honestly described a flaw in the item. Besides, it powers up, looks in good shape, and is cheap! Also the listing included 'make an offer'.
Often when making a first offer on something I'll start with a very low offer. Half the list price for instance. Hey, I really am very cash-poor, and sometimes sellers will accept, or at least not bargain much higher. Also usually it's literally all I can afford at the time anyway. But in this case the gear is heavy and large, and packing it will be a pain. No point making an offer that won't be worth the guy's time. So I offered $100. He accepted.
A short while later, on 16th October the box arrived at the warehouse of Shipito, the US reshipper I use. It's a big box; 66.50 lbs (30.16 kg) 30"×23"×18" (77×59×46 cm) The total I'd need to pay to get it from there to Australia is $234.95, which is mostly TNT airfreight ($214.72), plus $13 to Shipito (large heavy parcel fee, plus $2 to add some Fragile stickers), plus about $10 to the bank for doing nothing but moving some data bits around.
Of course I didn't actually have $234 dollars just then. As usual it could be a while till I could afford the shipping costs. I'd guessed maybe another month. So it sat in Los Angeles, as I'd expected when buying it. Nothing unusual.
At the time I was busy with making some exterior stair railings in stainless steel for my mum's place. When I got to the point where I needed to weld the wall brackets to the rails, there was a problem. The rails are 3.5 meters long, and my workshop had a pile of stuff taking up the middle of the room. So I'd have to do the welding outside. But every day was windy... This is a problem since with stainless steel the weld absolutely must be within the MIG welder's shielding gas flow. Wind can blow this away, exposing the weld arc to air.
Alright, I've been putting off dealing with the 'pile of junk' in the workshop floor center way too long anyway. It's mostly a stack of very large lead acid batteries, salvaged, and intended for a backup power supply. There are three different kinds, of varying ages, and also they are overdue for a charge top up — which I couldn't do while they were stacked. In fact the oldest set, that were at the end of their working life anyway, are clearly deceased. The battery sides are visibly swollen, which shows the plates have irreversibly sulfated. The other two sets are still good, but these ones need to be taken to scrap metal recycling.
Anyway, on a weekend I moved them all outside, and started constructing a permanent storage space for them (and for firewood.) That's another project. Made a note to take the dead batteries to Sims Metals on Monday. With the workshop floor space clear I started setting up for the railings welds.
On Monday I got a very pleasant surprise. I'd never taken a significant weight of lead acid batteries to recycling before. This time, with the batteries and some other assorted scrap bins I took on the same trip, the payout was $233.45! Ha ha ha... Notice the very close match to the amount I needed for shipping the HP 83480A? I noticed that too. So on the way home I stopped at the bank, deposited the cash, then on getting home the first thing I did was transfer the money to shipito and flag that box to send.
That was Monday afternoon here in Sydney, which is late Sunday evening in Los Angeles. The box arrived in Sydney early Wednesday (local time) which I find rather amazing. Then it got even more amazing, almost farcical. Thinking it might be delivered to me that day, I was checking the online tracking every couple of hours. At 12 midday it said "in depot". I checked again at 1.30pm, and it said "out for delivery, customer not at home, returned to depot." What!? But but... I'm home (though in the workshop down the back) and there are two other people home in the house. What happened? I looked, and sure enough there was a 'sorry we missed you' note stuck in our front door, marked 1:05pm. No one heard him knocking, apparently. Also apparently the driver is not their usual guy on this run, since the regular one (a very pleasant Indian fellow) knows the deal here well, and just comes straight down the back to find me.
Sigh. Once I know a parcel is out for delivery I always put a notice by the front door saying to the courier 'I'm home, please come down to the rear workshop'. Just in case no one answers the door. This time they were too quick for me. There followed a lot of phoning back and forth. I wanted to minimise the amount of trucking around of my box, since the HP 83480A is big, heavy and delicate. For a while I thought I'd have to drive to the TNT depot in Botany that afternoon. But much to my relief the driver brought the box back again around 4.30pm that day.
And so... Now I have a HP 83480A, albeit still without plugins, and the shipping to Australia was effectively free and excessively quick. Actually better than free, since in the process I got the use of the floorspace in my workshop back. Also, once I'd set up the railing to make the bracket welds I'd become stuck with that 'oh god, what if I stuff it up?' fear, and literally couldn't make myself just do it. Expensive materials, one chance only, lack of confidence, etc. Painful. But the amusing events of the 83480A shipping, and the pleasure of it arriving undamaged provided the morale boost I needed to actually point the welding torch and pull the trigger. It went OK. That's for another post.
Now here's a photo log of initial testing and teardown of the HP 83480A.
 |
 |
 |
 |
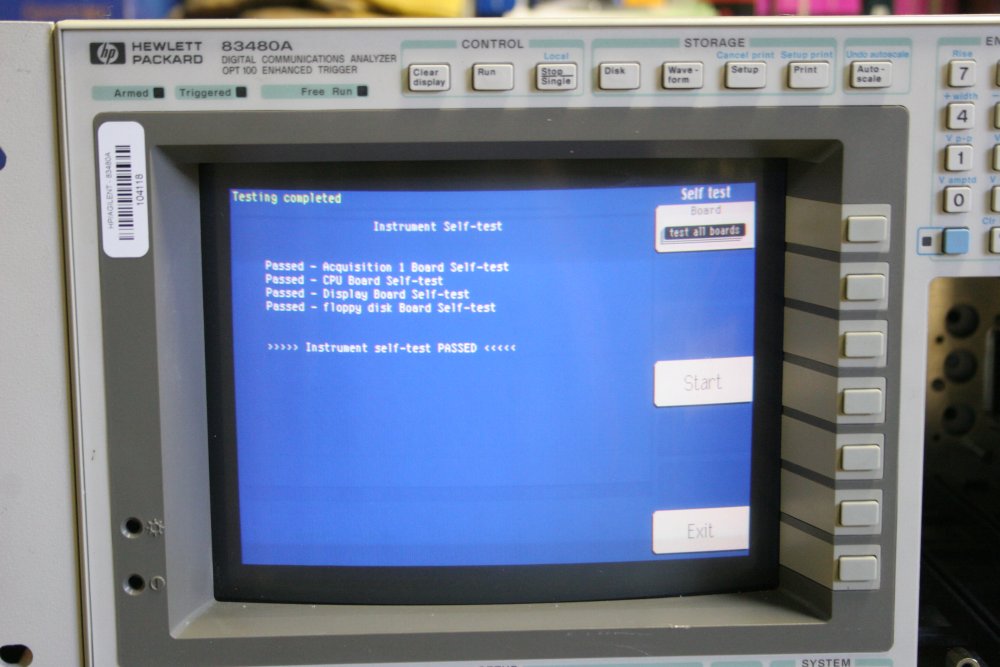
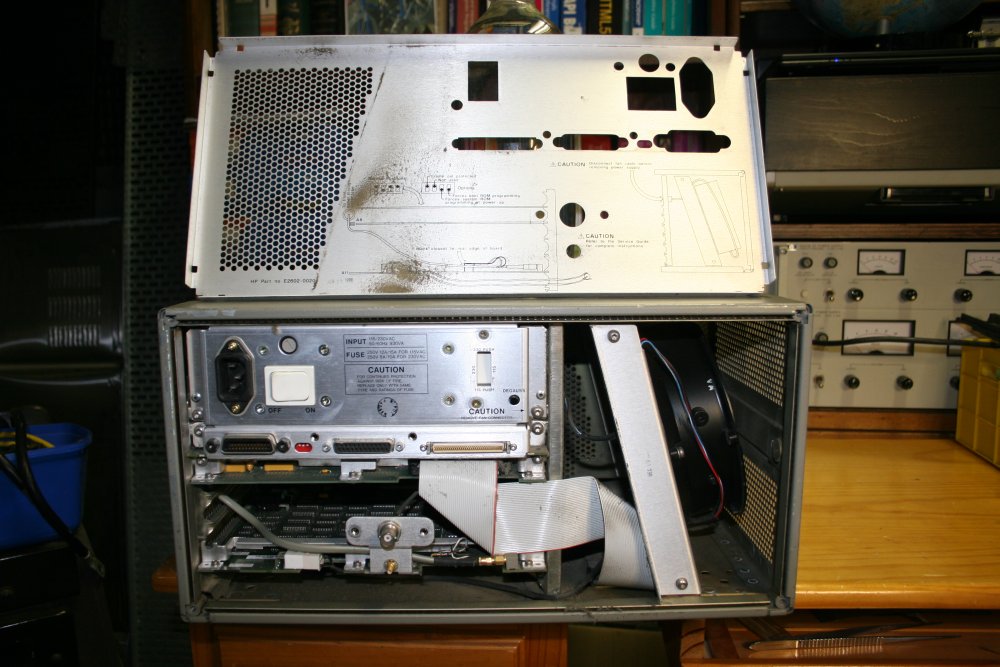
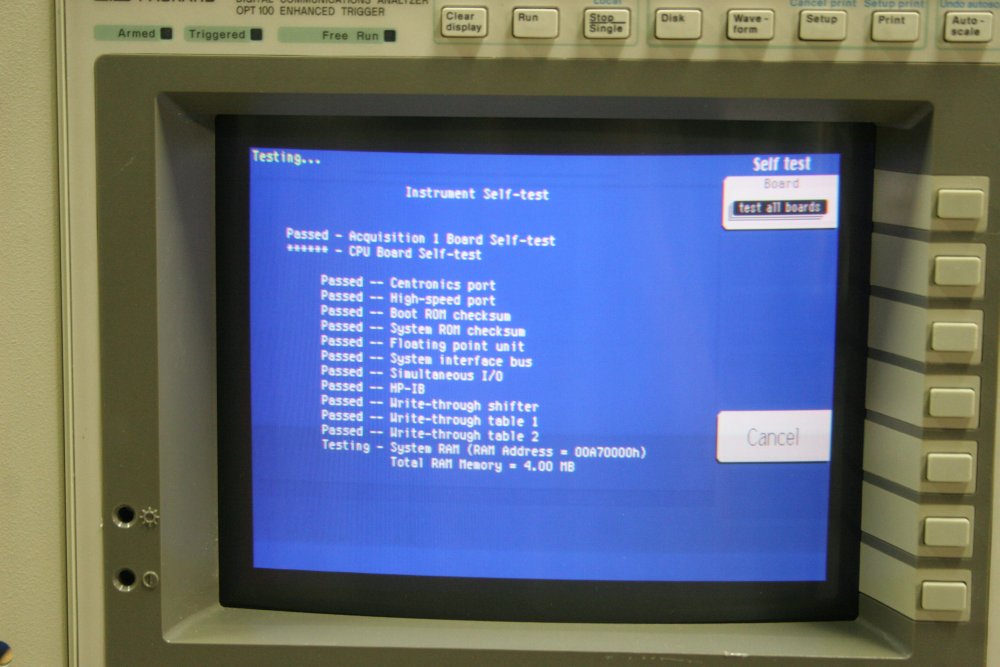
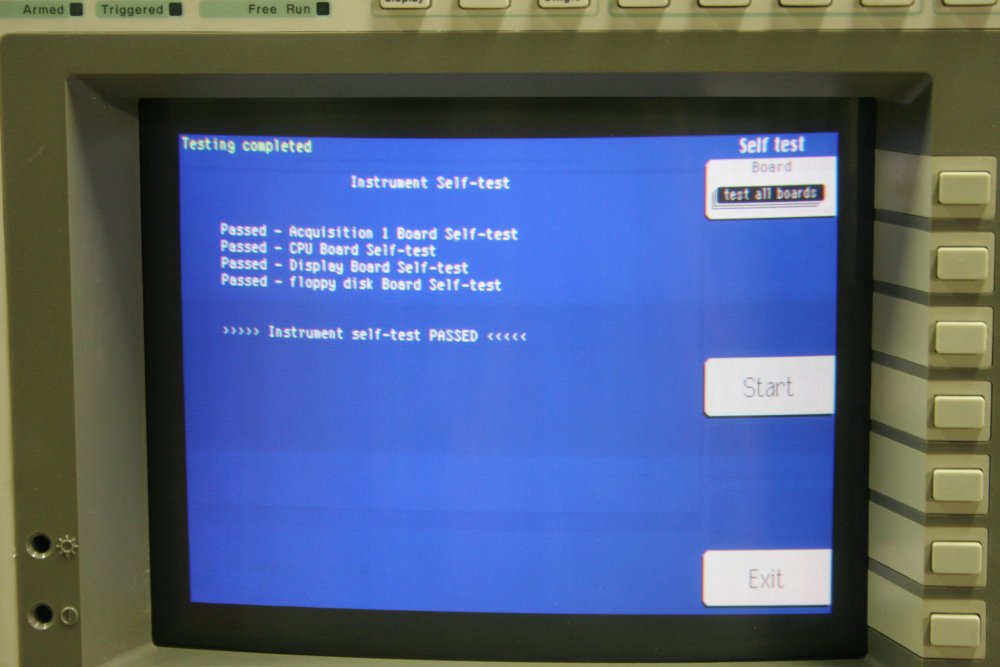
As received. There are the usual scuffs with second hand test gear, a couple of minor case dings, some slight damage to the lower edge of the plastic front panel, and those missing feet at the back. There's some screen burn-in of the usual image, but I can live with that. Overall the thing is in pretty good shape. Best of all, on powering it up and finding the self-test menu, it passes all tests! That was my major worry. This is the kind of gear that can be very difficult or quite likely impossible to repair if there are hardware faults. It's no longer supported by HP/Agilent/Keysight (I wish they'd stop changing their name), and I'm sure the 'service manual' which does exist won't include detailed schematics.
 |
 |
Here's some amusement value. Typically expensive test gear will receive regular calibrations, from a certified calibration service. They put a 'Calibration void if removed' security sticker over at least one screw that has to be undone to open the case. If the sticker is damaged the unit is considered to be no longer guaranteed in-cal.
Normally HP gear can be opened by removing screws securing the top and bottom panels, and sliding them off. The cal stickers are put over those screws. When first attempting to open this instrument I was slightly confused to realise that despite looking generally similar to usual HP case construction it doesn't have removable top and bottom covers. Oh? So maybe the whole case slides off? Which screws do I undo?
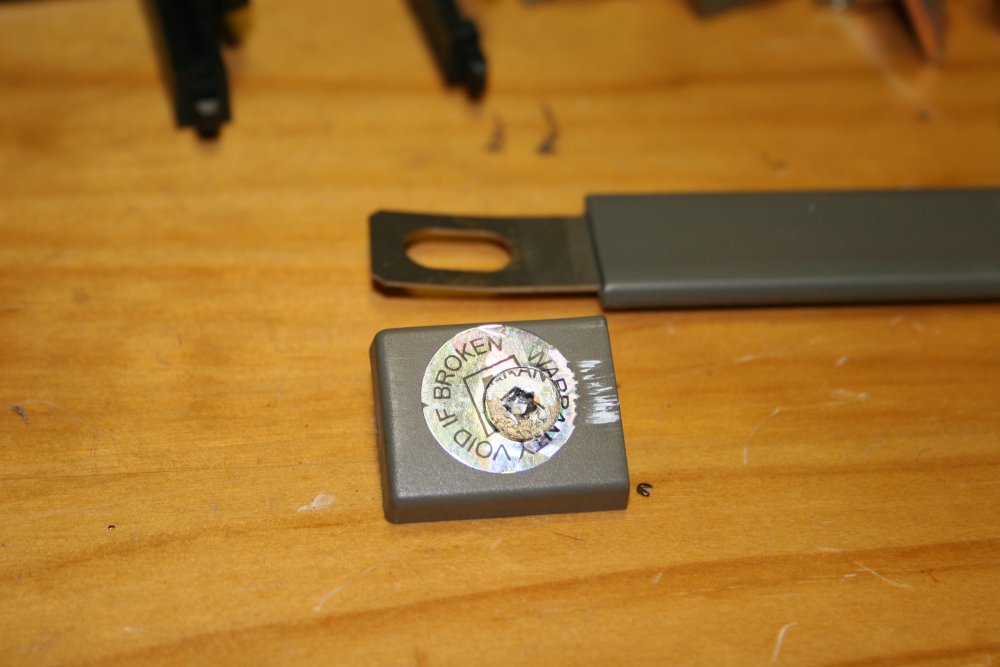
There were few obvious candidates. Among them were the screws at each end of the carry straps. Supporting the idea that these needed to be undone, there were 'waranty void if removed' stickers over two of these screws, and they'd been voided by someone previously jabbing a screwdriver through them, and undoing the screws. So I undid the first one.
Ha ha ha. It's just a retaining screw for the carry handle. It does nothing towards removing the case.
At this point I realised that my assumptions about how this thing probably disassembled were completely wrong, and I needed to pay close attention. Which someone else, who put these stickers on, apparently didn't.
The 2nd photo above is after I figured it out, just to show the screw hole for the carry handle. It's the hole in the center of the photo.
 |
 |
 |
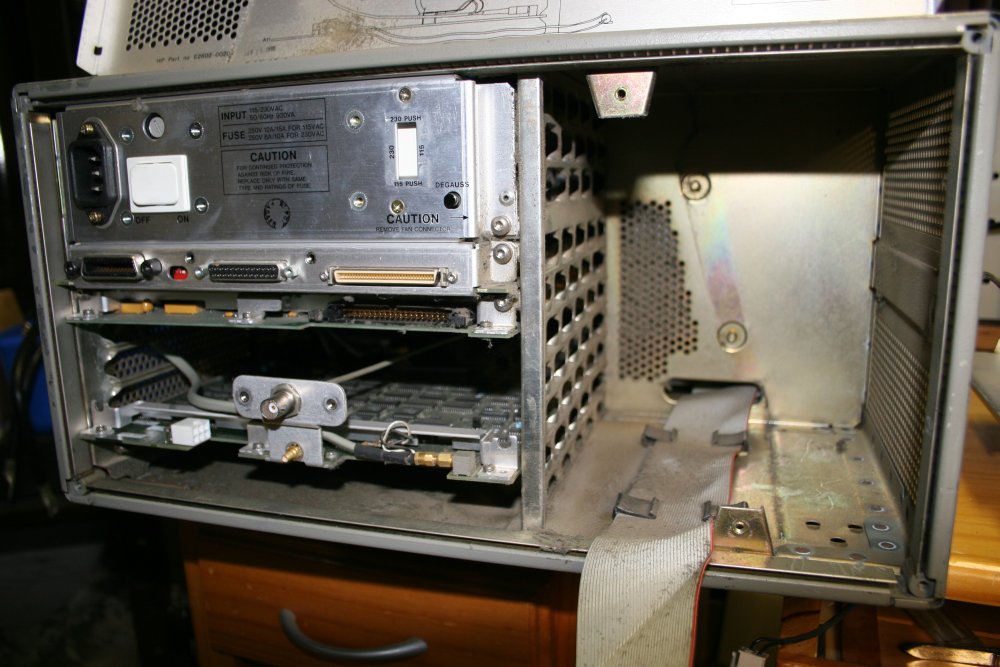 |
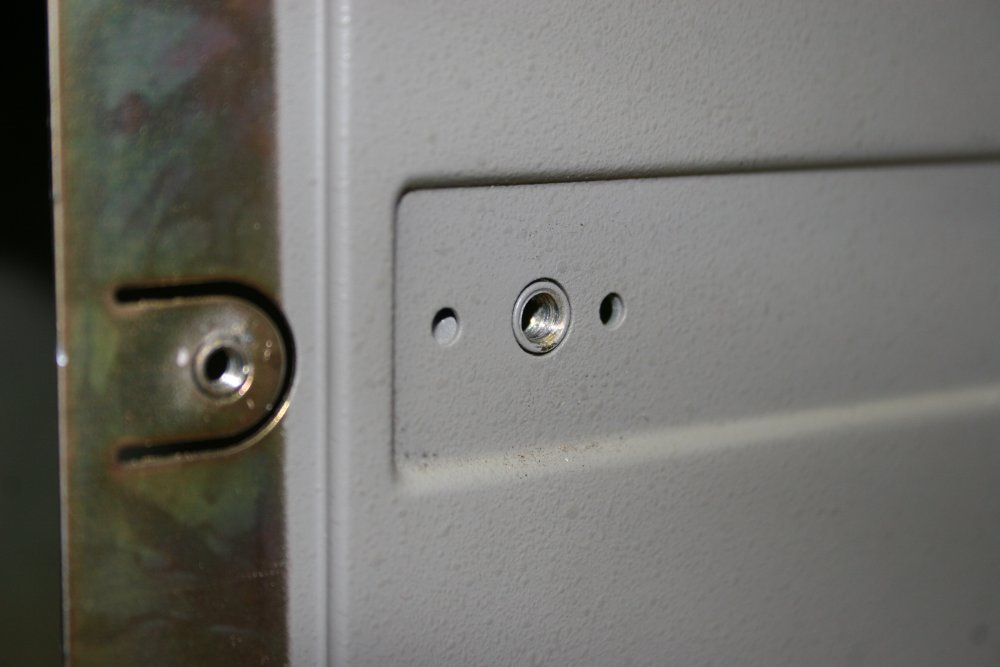
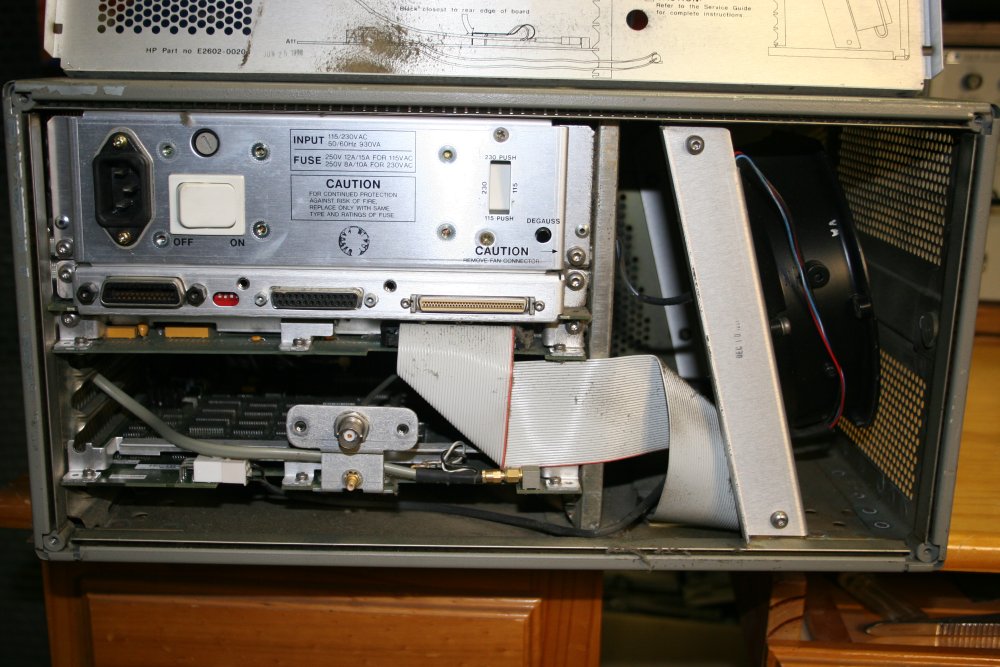
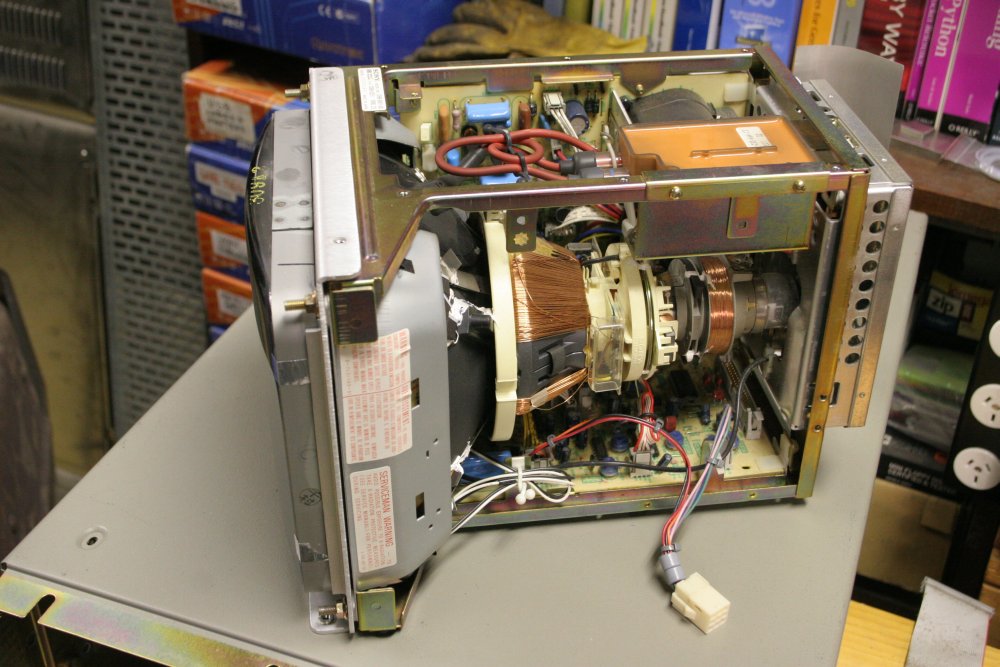
The entire case is actually a spot-welded single unit, for RF shielding continuity. Access to internals is by removing the front and rear panels, after which components can be removed via the front or rear openings. Even the interior bulkheads, as seen in the 1st pic, are spotwelded permanent fixtures.
Inside, there's a lot of dust, but interestingly no sign of it having been disturbed recently. Also all the cards that should be present are there. So I'm crossing my fingers that whoever removed the rear feet (which must be removed to disassemble the case) were the result of someone trying half-heartedly to open it then giving up before getting any further. They'd have had to remove other screws too, including those for the fuse cover, and those are all still present. Or maybe they did get the case open, saw the amount of dust and went 'Nope! Sell it!' Since, to clean something in that state really does require complete disassembly, which is a lot of work. But I don't mind.
 |
 |
 |
 |
 |
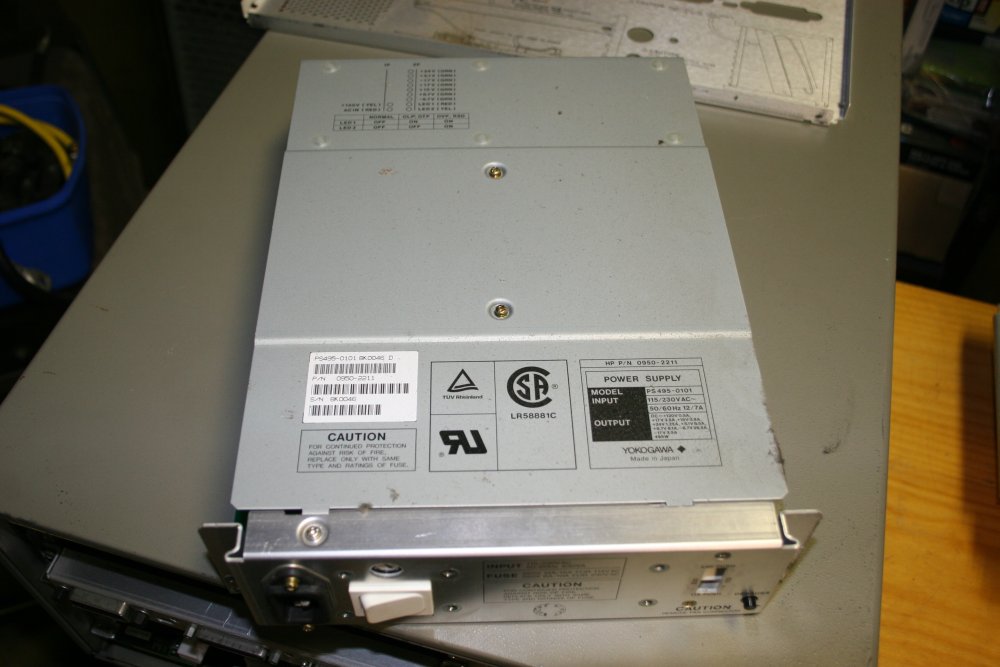
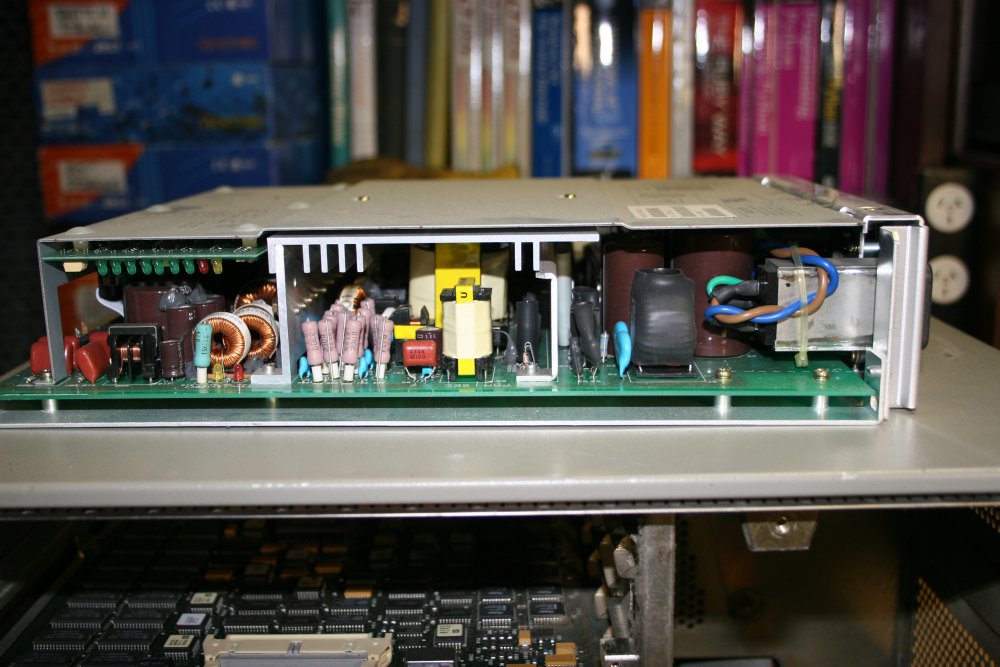
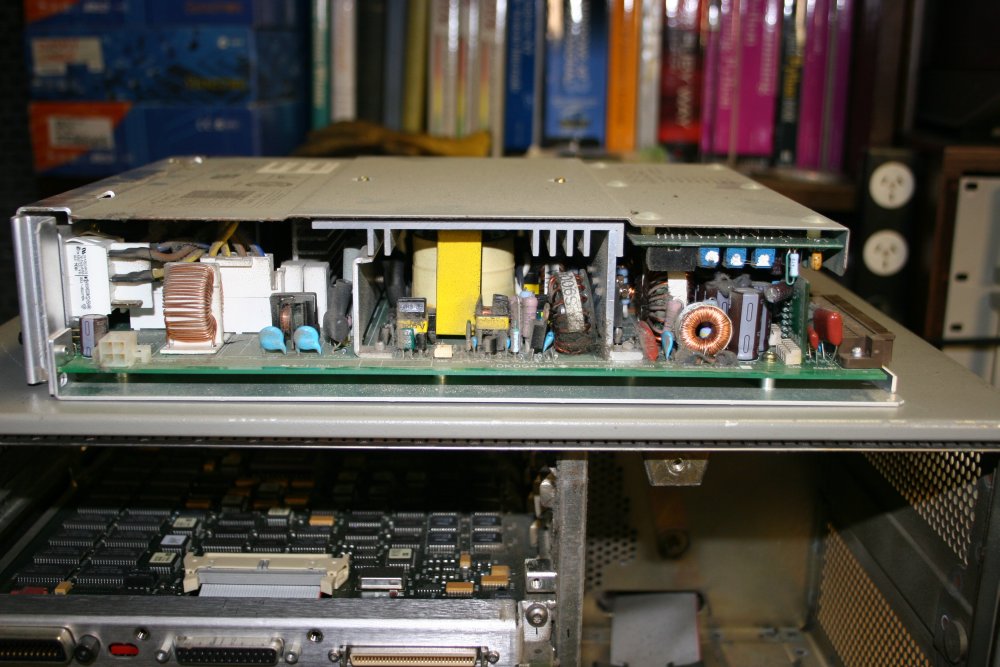
The power supply is an OEM, by Yokogawa, Model PS495-0101. HP P/N: 0950-2211 SN: 8K0046.
One thing about non-HP OEM parts like this, is there's always a faint chance of being able to find schematics.
This was the first part I tried cleaning the dust out of. More good fortune, as it turns out the dust is the kind that can be almost entirely blown off with compressed air, and there's no noticable corrosion. Some dust can be oily, and impossible to remove without detergent, scrubbing, etc. Worse, dust can be corrosive. This dry, chemically neutral dust is the best kind. Between compressed air and brushing with a small paintbrush it's fairly easy to remove.
Next I pulled the CPU and graphics boards. Had to pull them together, as they are interconnected by a short ribbon cable. But there's a battery on the CPU board, so great care must be taken to not let the boards press together, for fear of causing damage or data loss by short circuits of the battery powered circuitry. Once the boards are separated it's safer.
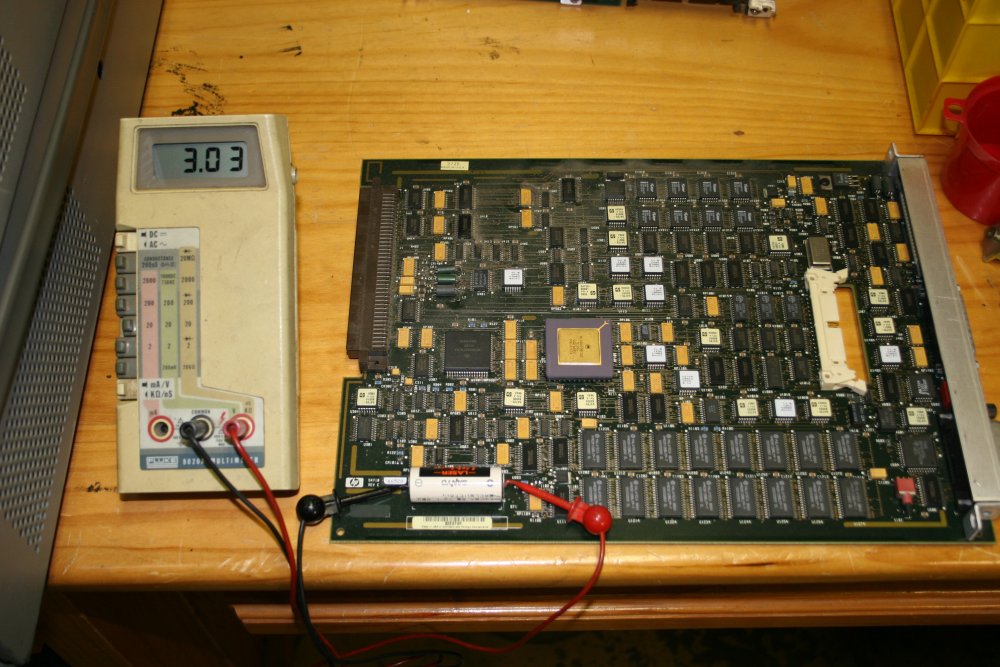
First thing to do was check the battery voltage. The battery should be replaced, but how urgently? I don't know if any instrument calibration data relies on this battery, or if it's held in Flash. There's a lot of Flash memory on the board.
While setting up for that photo with the multimeter, I nearly gave myself a heart attack. First meter I picked up had alligator clips. Carefully, I first checked the meter wasn't on current range, then measured battery voltage by holding the clips to the battery. Oh, OK, it's still about right for the battery. But let's take a photo of that. Can't get the alligator clips onto the battery terminals, needs something like an EZ-hook. Picked up another meter that has EZ-hooks on its leads. Touched them to the battery, and at that same instant realised 'wait, did I..?' Sigh, I am getting so forgetful in my old age. No, I didn't check the meter range, and yes the leads were plugged into the 'mA' socket. A very brief touch to the battery, but with electronics 'human brief' is a long time. Gahh... Now I'm worried I may have just erased calibration data. But I won't know until I finish cleaning and reassembling the instrument.
Anyway, set that meter up correctly and took the photo. The battery won't have minded a momentary near short. Those leads are thin wire too, which means maybe lead resistance prevented the on-board Vbat from going right down to zero. Fingers crossed, and on with the cleaning.
Major chips on the CPU board are:
CPU: Motorola MC68020RC16E with MC68882FN16A.
Flash: 16 x Intel 28F010.
Ram: 32 x Hitachi HM628128BLFP-7.
HP-IB: TMS 9914AFNL.
 |
 |
 |
 |
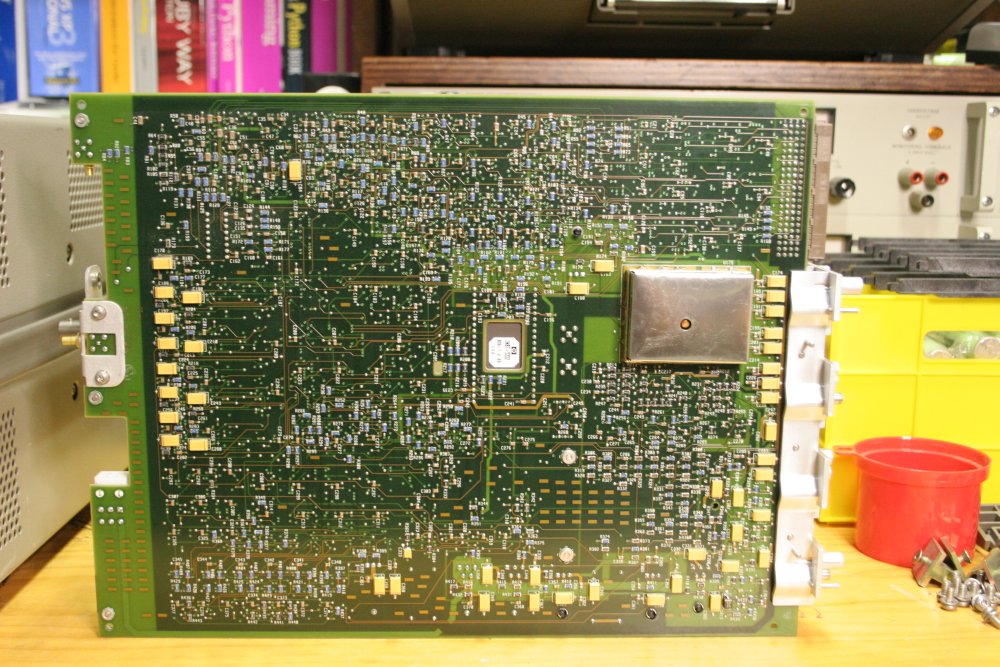 |
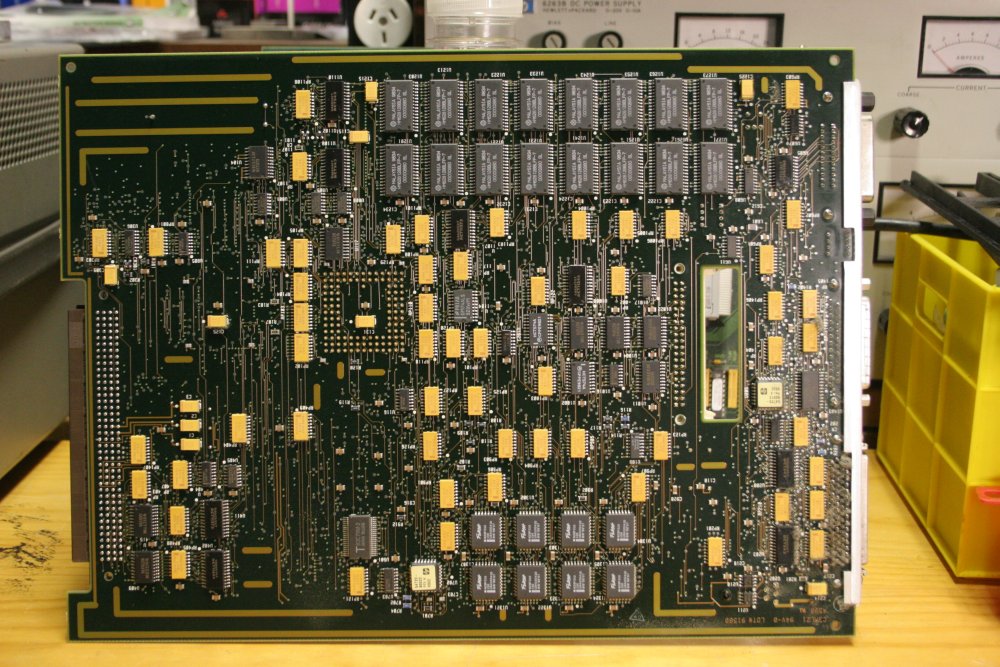
Then there's the graphics board, on which the controller is a TMS34010FNL-60. This board has components only on one side. The second photo is the back of the CPU board.
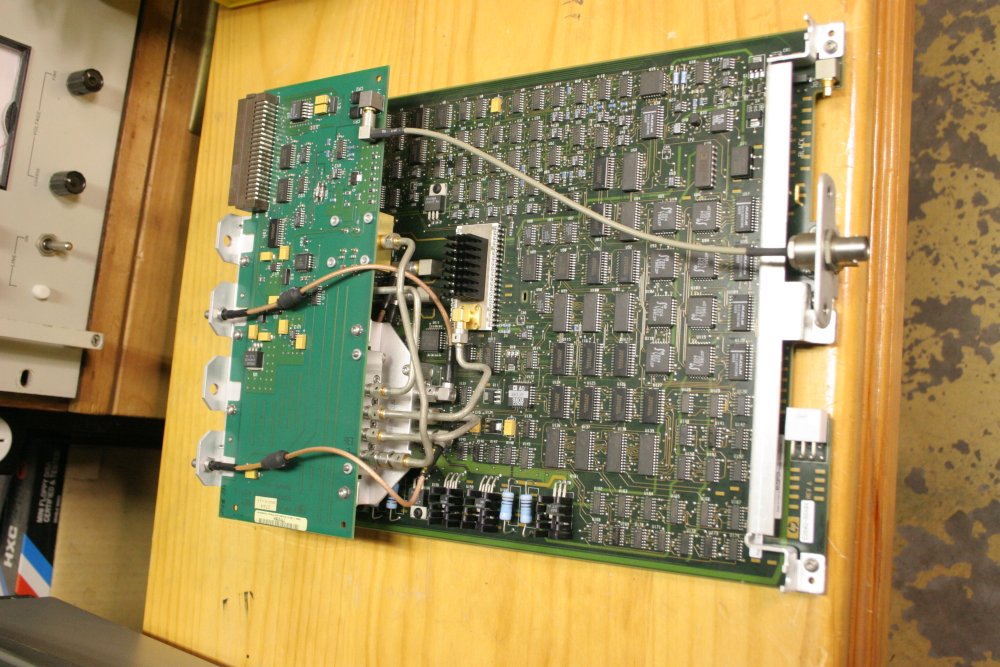
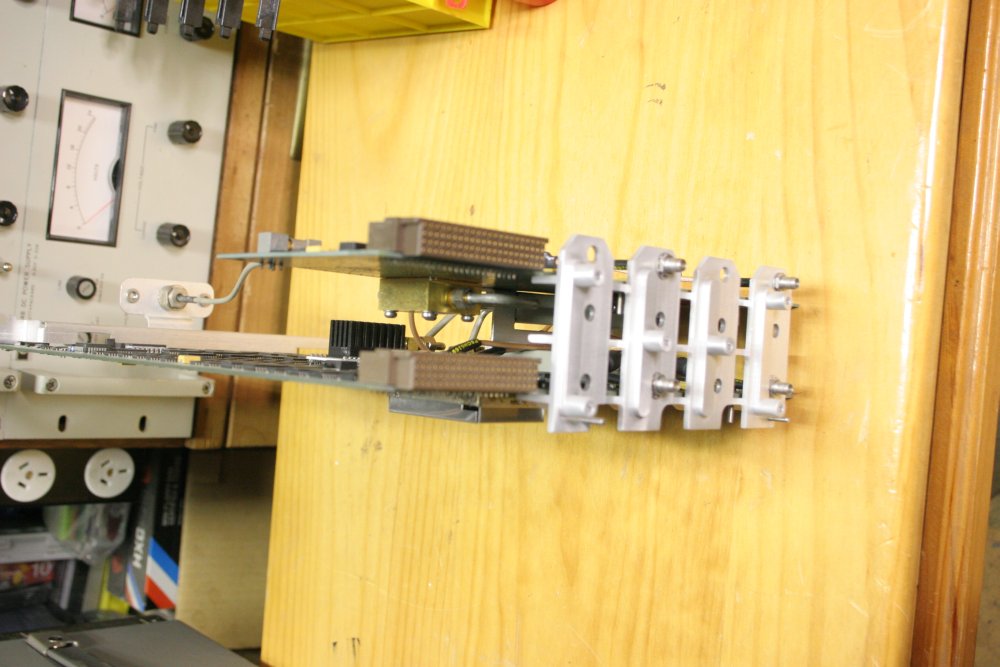
The trigger and acquisition boards remove from the mainframe as a unit, since they are both mounted on the machined metal frame that provides precise location of the precision coaxial connectors for plugin modules. Also there are all those hardlines and SMA connectors, which I'm not going to touch without a damned good reason. So there'll be no pics of these two boards separated. This level of disassembly was sufficient for dust cleaning.
 |
 |
 |
 |
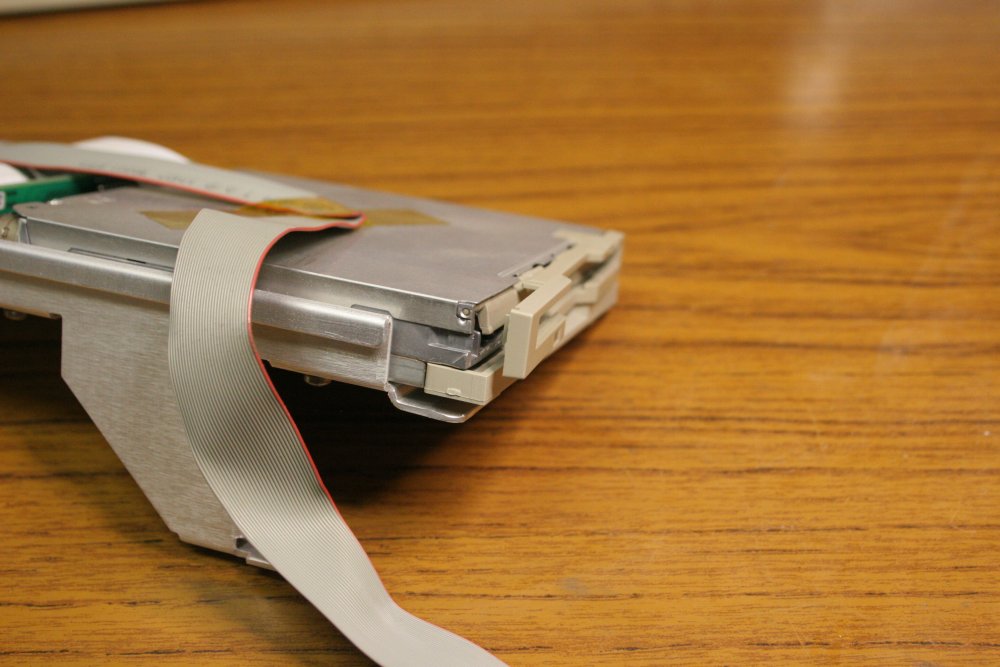 |
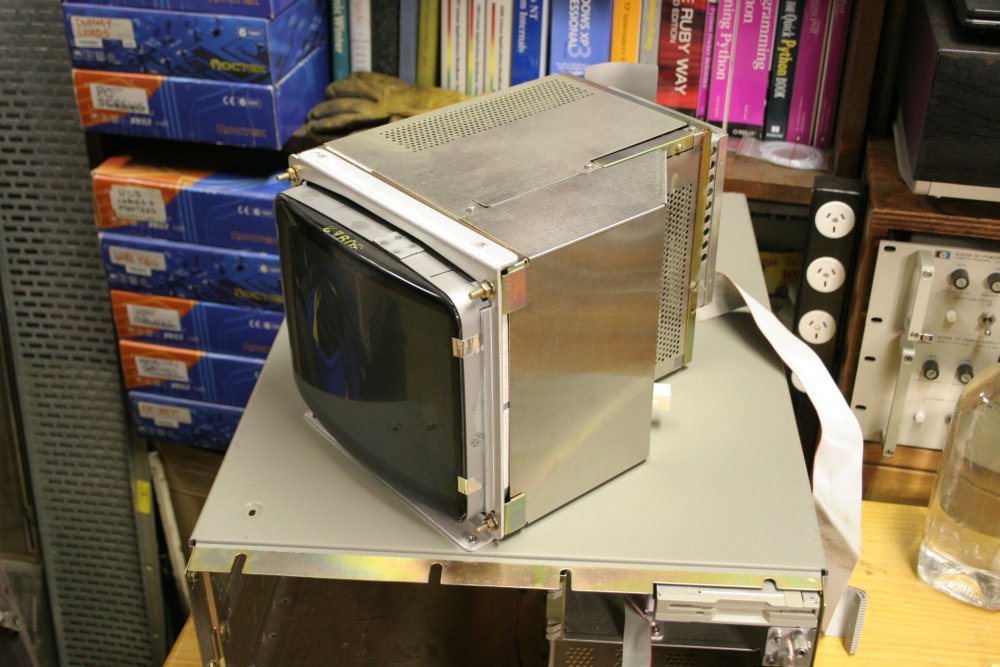
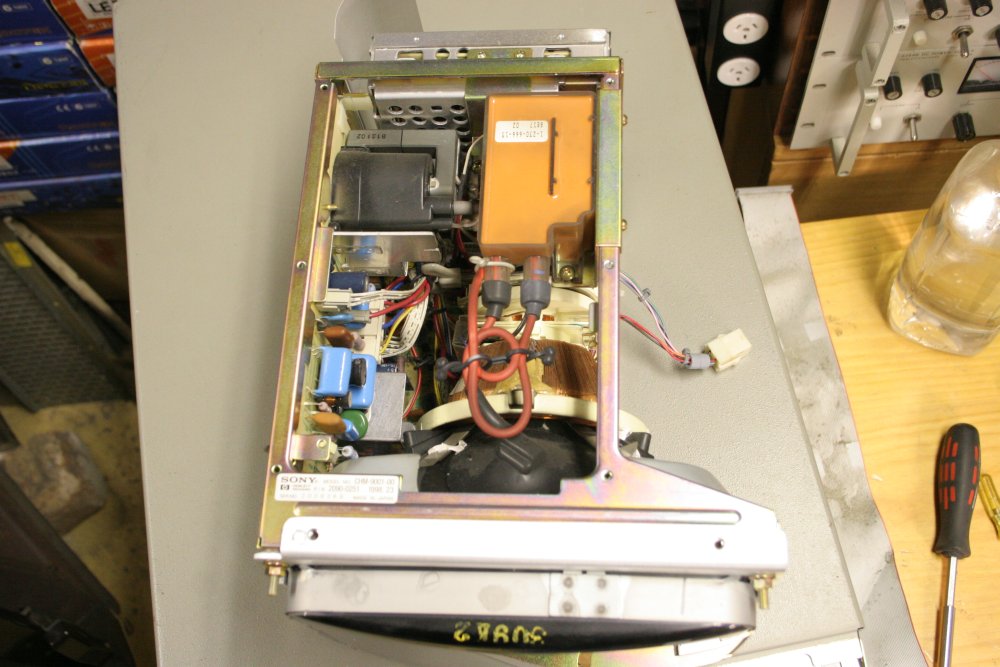
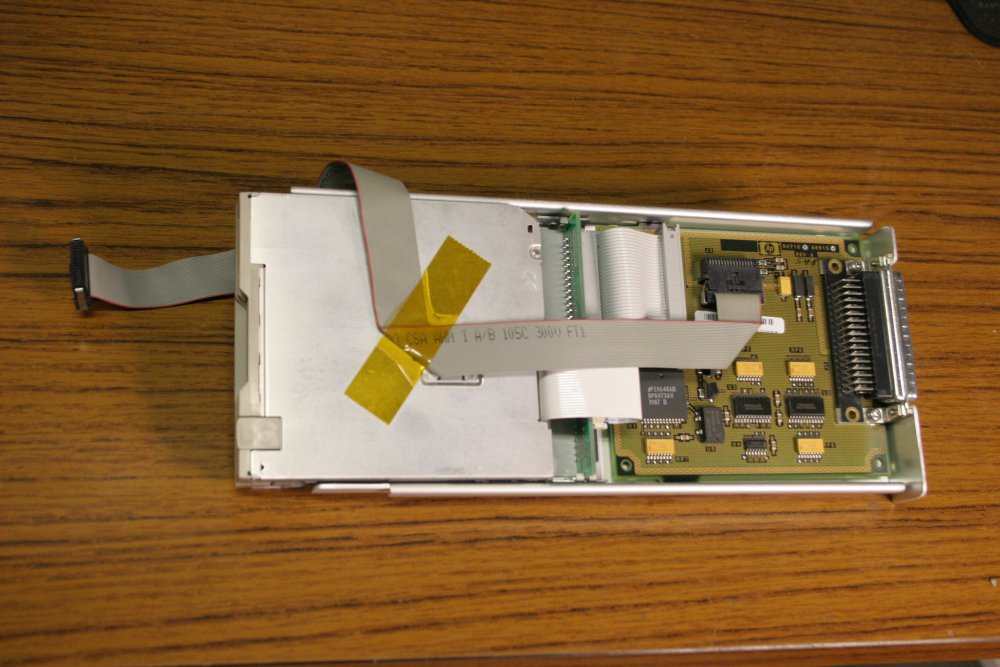
Two more modules removed from the case — the CRT and floppy disk. The colour CRT is a Sony CHM-9001-00, HP P/N 2090-0251 1998 23, SN 2008389. Again, there may be a faint hope of getting a schematic for this. It too was quite dusty inside, but easily cleaned. The hardest things to clean had been the two fans, which were both easily removed from the chassis. After removing the floppy drive I found the single instance of anything actually broken in this instrument. A small retaining tab on the plastic fascia was broken off, as seen in the last pic. Easily fixed with a small dot of glue.
 |
 |
 |
 |
 |
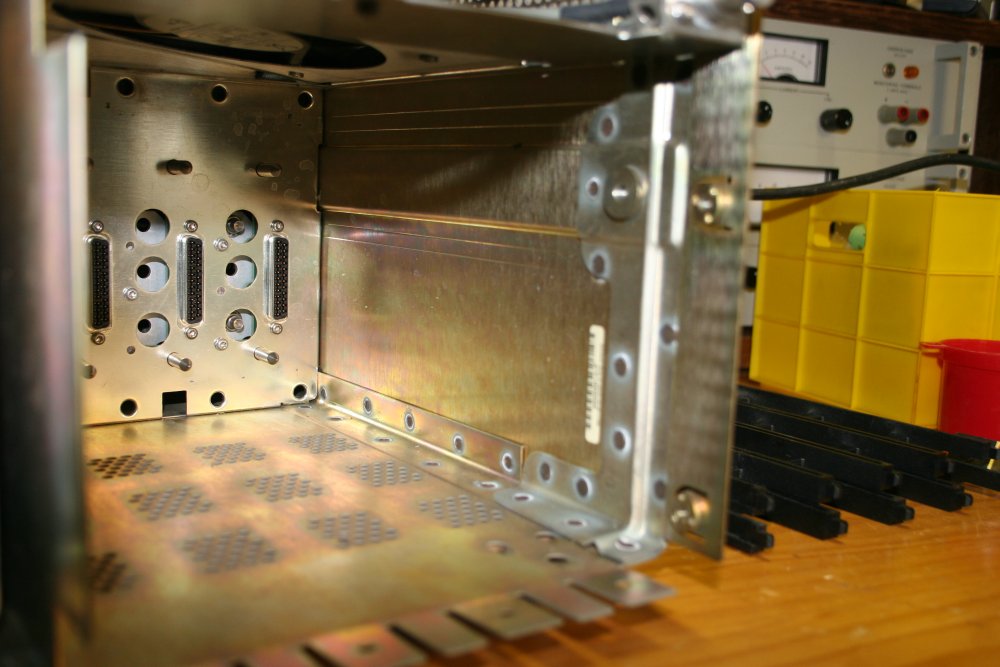
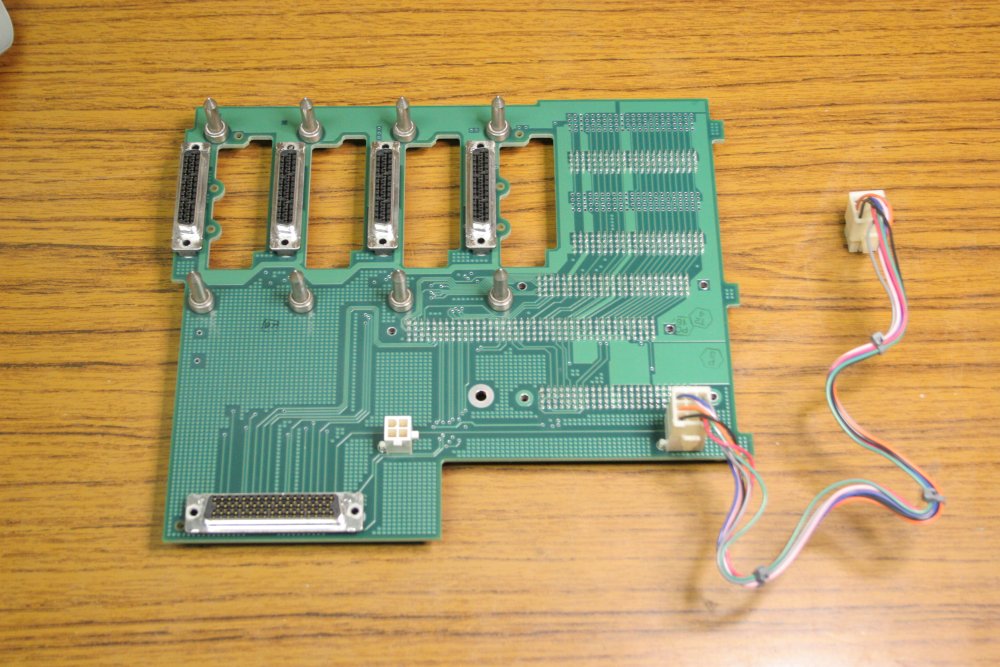
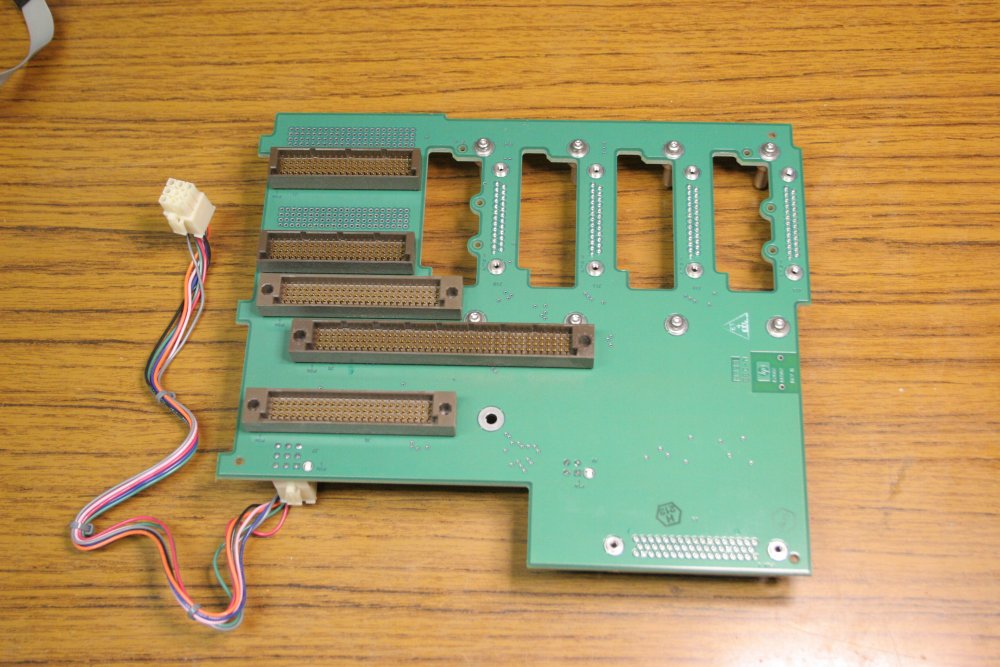
At first I'd decided to not remove the backplane from the chassis, since backplanes are always a pain to remove. But then it turned out that to flatten one of the small dents in the case, I'd be swinging the hammer right next to the backplane. So out it came. Sigh, numerous screws in awkward locations.
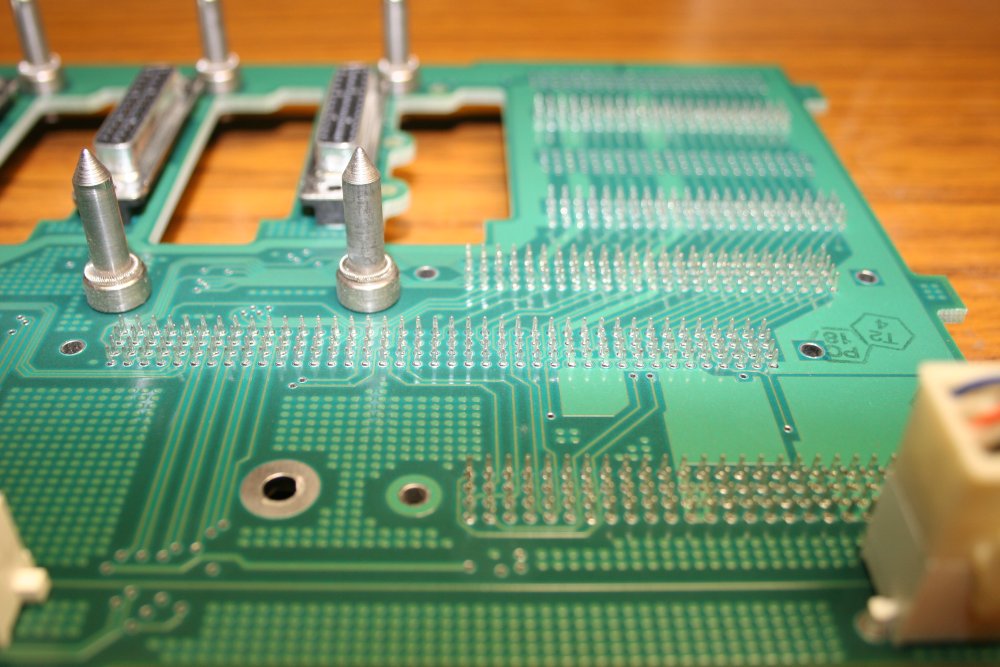
It's a little disturbing to find that the backplane connectors are the no-solder kind, where springy pins are forced tightly into the through-plated holes in the backplane PCB. These things make me nervous, since that's a solder to pin-plating pressure contact. I refuse to believe that can be reliable. And there are a lot of those contact points. Hmpf. If this machine ever shows the slightest hint of flakey backplane connections I'm going to solder them all. For the moment they can stay as they are. One plus for these, is that at least it's possible to replace the connectors if a pin gets broken. If one can source a new connector.
Note the cute little RF gasket springs around the stainless locating pins in the 3rd pic.
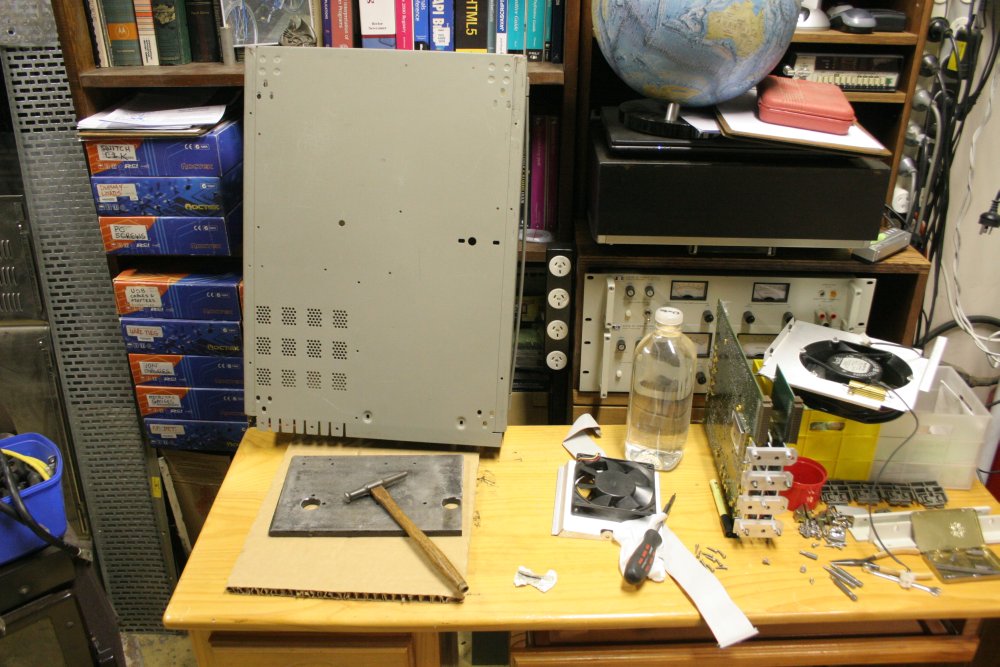
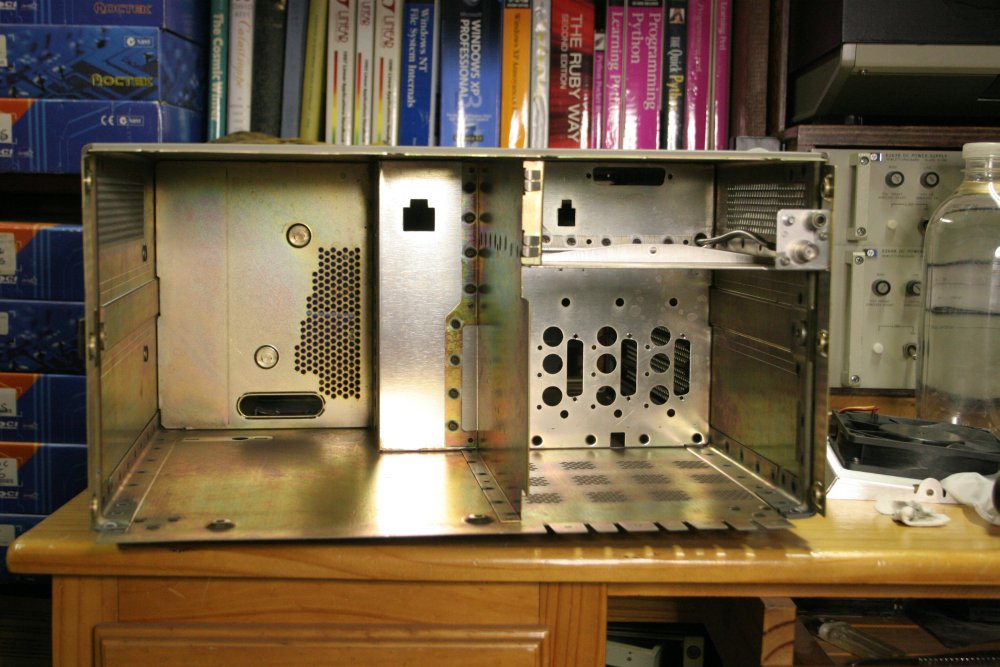
The 4th pic was while checking the result of hammering out dents in the case. Funny pic — a top electronics instrument from around 1998, being repaired with a hammer that was probably already old when my grandfather bought it sometime in the very early 1900s. Anyway, dents gone.
The last pic at right is the completely empty chassis. Just the cable for the calibration output BNC still mounted, since it wasn't necessary or easy to remove that.
 |
 |
 |
 |
Finally, reassembly. It all went back together without drama. No missing or leftover screws. Nice and clean now, so I don't have to worry about dust causing any cascading faults. Ever since I put off cleaning severe dust out of a PC I was restoring, and then a couple of days later the power supply had a 'dust caused mains voltage arc' that destroyed the machine, I've treated heavy dust deposits as an urgent problem.
Then there's that moment of dread when first turning something like this back on after reassembly. 'Did I break anything?' (There have been a few classic disasters in my past. Not too many, but definitely some embarrassing moments.)
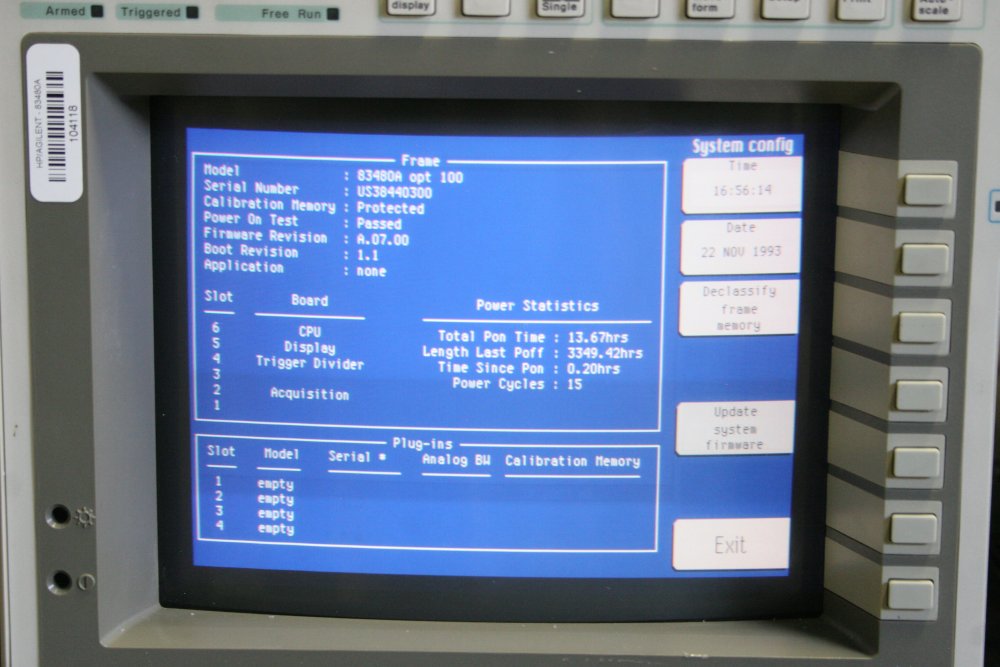
Nope! Not this time. It still passes all self tests. Doesn't seem to be complaining about any calibration data loss. The real time clock has been wiped, but that's easily reset.
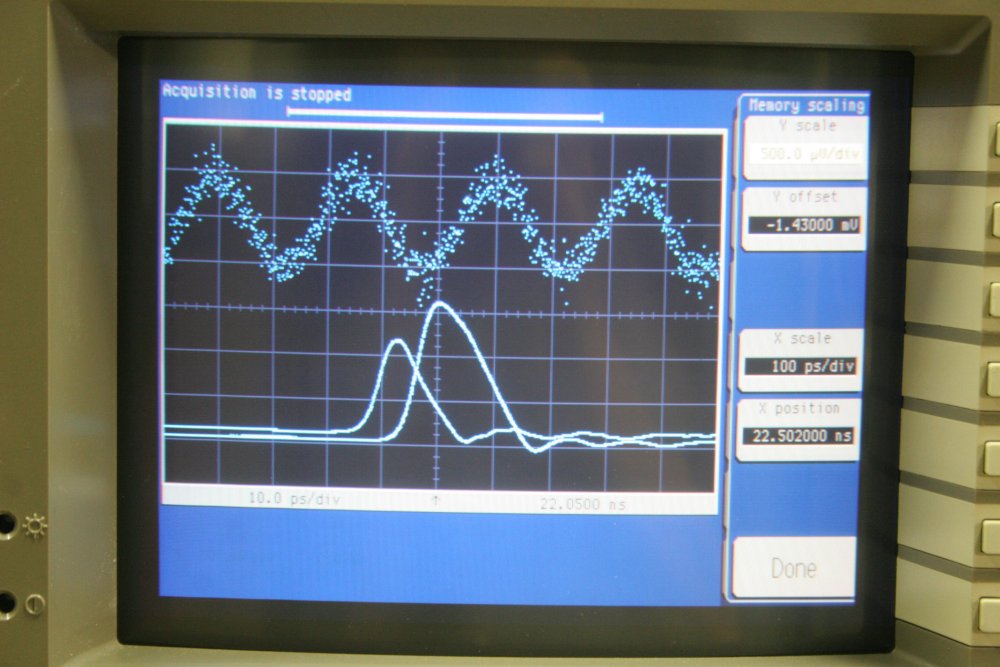
Amusingly, when running through menus I tried displaying saved waveforms. And found that whoever used this last had three saved samples. A noisy sine wave of around 3.8GHz and 1mV pp, plus two pulse waveforms stored at 100pS per division. So despite not having any plugins for this intrument yet, at least I can see some waveforms on screen, and play with the various display, measure, FFT, etc features.
There's a quick way to wipe waveform stores like that. It's in the Utility - SystemConfig menu. Only rather than calling the softkey 'Clear Waveforms' it's called 'Declassify Frame Memory'. Which the manual makes clear really means 'declassify', as in make no longer secret. Because I suppose it's a fair assumption that anyone using one of these around the time they became available, would fairly likely be engaged in classified work.
Oh, and the floppy disk works. The filename 'COAX750' is another relic of the previous owner's waveform store, I gather.

COAX750. Let's hope this isn't secret.
The colour choices for screen elements seem to be the defaults. Maybe I'll bother to change them, at least to something less inducive of screen-burn. However on a first attempt I can't seem to find the 'text colour' element(s). Everything else yes, and the blue background is now black. But without being able to alter the text there's not much point playing colour fiddles. For now I'll just run it with the brightness turned way down. I wonder if the disk operations set allows save/load of colour profiles?
One rather nice feature is a Help button, that brings up a long subject list giving the keys by which the corresponding function is accessed. Heh. I keep finding things that make me laugh. In Time Base - Windowing, the finest window scale factor is 200 fempto seconds per division.
No wonder there's screen burn and dust. Reading the manual, it seems like they are recommending the instrument be left on all the time. Since (in a constant temperature environment) this reduces requirements for recalibrations.
So, that's as much as I can do till I find a plugin module or two for this, that I can afford. That may be some while. Till then this is going to sit on a shelf under a dust cover.
Plugins like these:
HP 83482A : 30 GHz integrated optical channel and 40 GHz electrical channel.
HP 83483A : Dual 20 GHz electrical channels.
HP 83484A/B : Dual 50 GHz electrical channels.
HP 83485A : 20 GHz integrated optical channel, SONET/SDH 155, 622, 2488, and 9953 Mb/s reference receiver and 20 GHz electrical channel.
In the meantime there's the hunt for the HP 54750K firmware upgrade, and any other application software I can find. Plus a service manual, a blanking panel or two, set of four rear feet, a replacement 3V battery, schematics for the power supply and colour monitor, and maybe a new CRT.